
智能心率检测
| 操作系统 | 云服务/平台 | 技术难度 | 关注领域 |
|---|---|---|---|
| RTOS | Gizwits Cloud | 中级 | Healthcare,Sensors |
任务目标
主要是将心率传感器连接到Gokit开发板提供的ADC接口以收集心率信息。 当心率值高于阈值时,LED灯亮起。
所需材料/所需清单/工具
• BG96
• Gokit4
• Led
源码/示例/可执行的应用程序
附加资料
搭建/在组装说明
使用的零件
以下是此项目中使用的项目。
1. windows7 台式机。
2. 脉搏传感器,用于收集心率信息。
3. led,当检测到的心率值超过设定的阈值时,点亮led。
4.杜邦线,用于连接其他组件作为电线。
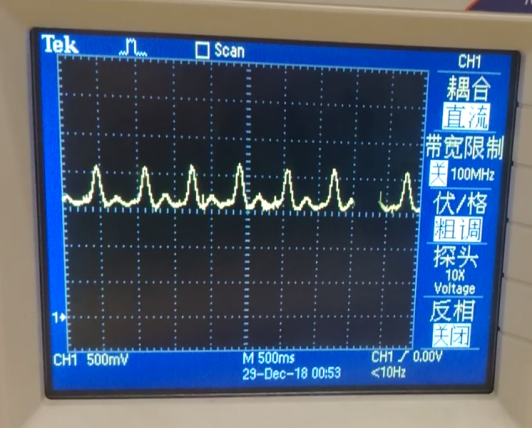
5.示波器,示波器用于实时查看检测到的心率波形。
部署项目
1.根据demo需求,结合Gokit开发板板载资源,采购合适的器件。
2. 测试选购的器件是否可用。
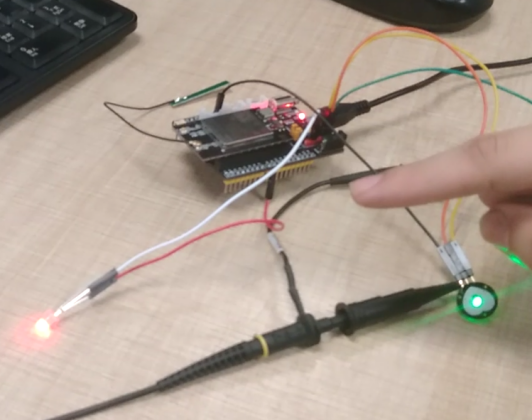
3.搭建,调试硬件电路。
4.本地创建demo-Smart-Heart-rate-detector项目。
5. 移植相关源码。
6.开发心率计算的相关功能。
7.联调。
8.代码上传至github。
工作流程
现在让我们介绍一下demo-smart-heart-rate-detector的工作流程。
gagentMain---->sensorInit----->led_init---->Pulsesensor_init.
demo-Smart-Heart-rate-detector/main/main.c
void gagentMain(void)
{
getFreeHeap();
sensorInit();
gizwitsInit();
timer_init();
timer_start();
}
GAgent调用了名为gagentMain的函数,GAgent的主要作用是数据转发,它是设备数据,云计算和应用程序端(APP)之间的数据交互桥梁。在函数sensorInit中,做一些传感器初始化。
void sensorInit(void)
{
gizLog(LOG_INFO, "Sensor initialization ...\n");
led_init();
Pulsesensor_init();
}
void led_init()
{
gizLog(LOG_INFO, "in led init...\n");
led_gpio_config();
led_on_off(false, led_red);
}
void Pulsesensor_init()
{
qapi_Status_t status = QAPI_ERROR;
const char *Channel_Name_ADC0 = ADC_INPUT_ADC0;
qapi_Timer_Sleep(2, QAPI_TIMER_UNIT_SEC, true);
status = adc_open_handle();
if(status != QAPI_OK)
{
//IOT_DEBUG("Get ADC Handle ERROR!");
gizLog(LOG_INFO,"adc open handle error...\n");
return;
}
status = adc_get_properties(Channel_Name_ADC0, &Properties_ADC0);
if(status != QAPI_OK)
{
//IOT_DEBUG("Get ADC channel-%s Configuration ERROR!", Channel_Name_ADC1);
gizLog(LOG_INFO,"Get ADC channel-%s Configuration ERROR...\n", Channel_Name_ADC0);
return;
}
}
demo-Smart-Heart-rate-detector/driver/timer/timer.c
qapi_Status_t timer_init(void) //init
{
qapi_Status_t status = QAPI_OK;
memset(&timer_def_attr, 0, sizeof(timer_def_attr));
timer_def_attr.cb_type = QAPI_TIMER_FUNC1_CB_TYPE;
timer_def_attr.deferrable = false;
timer_def_attr.sigs_func_ptr = timer1_handler;
timer_def_attr.sigs_mask_data = 0x11;
status = qapi_Timer_Def(&timer_handle, &timer_def_attr);
return status;
}
qapi_Status_t timer_start(void)
{
qapi_Status_t status = QAPI_OK;
memset(&timer_set_attr, 0, sizeof(timer_set_attr));
timer_set_attr.reload = 100;
timer_set_attr.time = 10;
timer_set_attr.unit = QAPI_TIMER_UNIT_MSEC;
status = qapi_Timer_Set(timer_handle, &timer_set_attr);
return status;
}
void timer1_handler(uint32_t data) // timer callback
{
static bool led_red_status = true;
getHeartRateValue(&heartrate); //get heartvalue
if(!heartrate) //no value
{
return;
}
else if(((heartrate > HEART_RATE_THRESHOLD_HIGH) || (heartrate < HEART_RATE_THRESHOLD_LOW))) // value is not vaild
{
led_on_off(true, led_red); //red on
//led_on_off(led_red_status, led_red);
//led_red_status = !led_red_status;
}
else // value is vaild
{
led_on_off(false,led_red); //red off
}
}
demo-Smart-Heart-rate-detector/driver/plusensor/plusensor.c
uint8_t getHeartRateValue(uint32_t* heartrate ) //Algorithm implementation for calculating heart rate
{
gizLog(LOG_INFO,"in getHeartRateValue...\n");
.......
memset(&result, 0, sizeof(result));
status = qapi_ADC_Read_Channel(adc_handle, &Properties_ADC0, &result); // read the Pulse Sensor
........
sampleCounter += 10; // keep track of the time in mS with this variable
Num = sampleCounter - lastBeatTime; // monitor the time since the last beat to avoid noise
// find the peak and trough of the pulse wave
if(Signal < thresh && Num > (IBI/5)*3) // avoid dichrotic noise by waiting 3/5 of last IBI
{
if(Signal < T) // T is the trough
{
T = Signal; // keep track of lowest point in pulse wave
gizLog(LOG_INFO,"Find trough, T = %d\n", T);
}
}
if(Signal > thresh && Signal > P) // thresh condition helps avoid noise
{
P = Signal; // P is the peak,keep track of highest point in pulse wave
gizLog(LOG_INFO,"Find peak, P = %d\n", P);
}
.....
if (Num > 600)
{ // avoid high frequency noise
if ( (Signal > thresh) && (Pulse == false) && (Num > (IBI/5)*3) )
{
Pulse = true; // set the Pulse flag when we think there is a pulse
IBI = sampleCounter - lastBeatTime; // measure time
between beats in mS
lastBeatTime = sampleCounter; // keep track of time for next pulse
if(secondBeat) // if this is the second beat, if secondBeat == TRUE
{
secondBeat = false; // clear secondBeat flag
for(int i=0; i<=9; i++)
{
rate[i] = IBI; // seed the running total to get a realisitic BPM at startup
}
}
if(firstBeat) // if it's the first time we found a beat, if firstBeat == TRUE
{
firstBeat = false; // clear firstBeat flag
secondBeat = true; // set the second beat flag
return 0; // IBI value is unreliable so discard it
}
// keep a running total of the last 10 IBI values
runningTotal = 0; // clear the runningTotal variable
for(int i=0; i<=8; i++)
{
rate[i] = rate[i+1]; // shift data in the rate array
// and drop the oldest IBI value
runningTotal += rate[i]; // add up the 9 oldest IBI values
}
rate[9] = IBI; // add the latest IBI to the rate array
runningTotal += rate[9]; // add the latest IBI to runningTotal
runningTotal /= 10; // average the last 10 IBI values
BPM = 60000/runningTotal; // how many beats can fit into a minute? that's BPM!
*heartrate = BPM;
gizLog(LOG_INFO,"BPM = %d\n", *heartrate);
QS = true; // set Quantified Self flag
// QS FLAG IS NOT CLEARED INSIDE THIS ISR
}
}
if (Signal < thresh && Pulse == true)
{ // when the values are going down, the beat is over
Pulse = false; // reset the Pulse flag so we can do it again
amp = P - T; // get amplitude of the pulse wave
thresh = amp/2 + T; // set thresh at 50% of the amplitude
P = thresh; // reset these for next time
T = thresh;
}
if (Num > 2500)
{ // if 2.5 seconds go by without a beat
thresh = 512; // set thresh default
P = 512; // set P default
T = 512; // set T default
lastBeatTime = sampleCounter; // bring the lastBeatTime up to date
firstBeat = true; // set these to avoid noise
secondBeat = false; // when we get the heartbeat back
}
}
1.从该github链接地址处下载代码。
2.编译代码并将镜像烧录到Gokit4开发工具包。
3.将心率传感器连接到Gokit开发板的ADC1通道。
4.将LED的一个引脚连接到开发板的D9引脚,另一个引脚连接到vcc。
5.打开示波器,调整到合适的档位,将心率传感器的脉冲信号输出引脚和GND连接到示波器。
6.USB数据线连接PC和Gokit开发板。
7.用手指触摸心率传感器的信号采集表面。
8.打开串口调试助手,可以实时查看采集到的数据。
9.当检测到的数据超过阈值时,可以看到LED点亮。
贡献者信息
| 姓名 | 公司 |
|---|---|
|
Zhen sunzhen@thundersoft.com |
Thundersoft |
|
Rong yangrong0925@thundersoft.com |
Thundersoft |
|
Jie wangjie0508@thundersoft.com |
Thundersoft |
|
Kou kouzw0723@thundersoft.com |
Thundersoft |
|
Eric yansh0810@thundersoft.com |
Thundersoft |
>>浏览更多Qualcomm硬件案例:http://qualcomm.csdn.net/m/zone/qualcomm2016/project
Qualcomm 开发者专区是 Qualcomm 联合CSDN 共同打造的面向中国开发者的技术专区。致力于通过提供全球最新资讯和最多元的技术资源及支持,为开发者们打造全面一流的开发环境。本专区将以嵌入式、物联网、游戏开发、Qualcomm® 骁龙™处理器的软件优化等技术为核心,打造全面的开发者技术服务社区,为下一代高性能体验和设计带来更多的想法和灵感。
加入 Qualcomm 开发者专区
申请成为“Qualcomm荣誉技术大使”
“Qualcomm荣誉技术大使”是Qualcomm开发者社区对开发者用户技术能力与影响力的认证体现,该荣誉代表Qualcomm社区对用户贡献的认可与肯定。
立即申请招贤纳士
Qualcomm在中国的业务发展迅速,每年提供大量的技术岗位,分布在北京,上海,深圳等地。Qualcomm开发者社区是开发者藏龙卧虎之地,Qualcomm中国HR特别设立了招聘通道,欢迎开发者同学踊跃报名。